INTRODUCTION
The Forgotten Realms
The world of the Forgotten Realms is one of high fantasy, populated by elves, dwarves, halflings, humans, and other folk. In the Realms, knights dare to seek out the crypts of the fallen dwarf kings of Delzoun, seeking glory and treasure. Rogues prowl the dark alleyways of teeming cities such as Neverwinter and Baldur's Gate. Clerics in the service of gods wield mace and spell, questing against the terrifying powers that threaten the land. Wizards plunder the ruins of the fallen Netherese empire, delving into secrets too dark for the light of day. Bards sing of kings, queens, heroes, and tyrants who died long ago.
On the roads and rivers of the Realms travel minstrels and peddlers, merchants and guards, soldiers and sailors. Steel-hearted adventurers from backcountry farmsteads and sleepy villages follow tales of strange, glorious, faraway places. Good maps and clear trails can carry even an inexperienced youth with dreams of glory far across the world, but these paths are never safe. Fell magic and deadly monsters are among the perils one faces when traveling in the Realms. Even farms and freeholds within a day's walk of a city can fall prey to monsters, and no place is safe from the sudden wrath of a dragon.
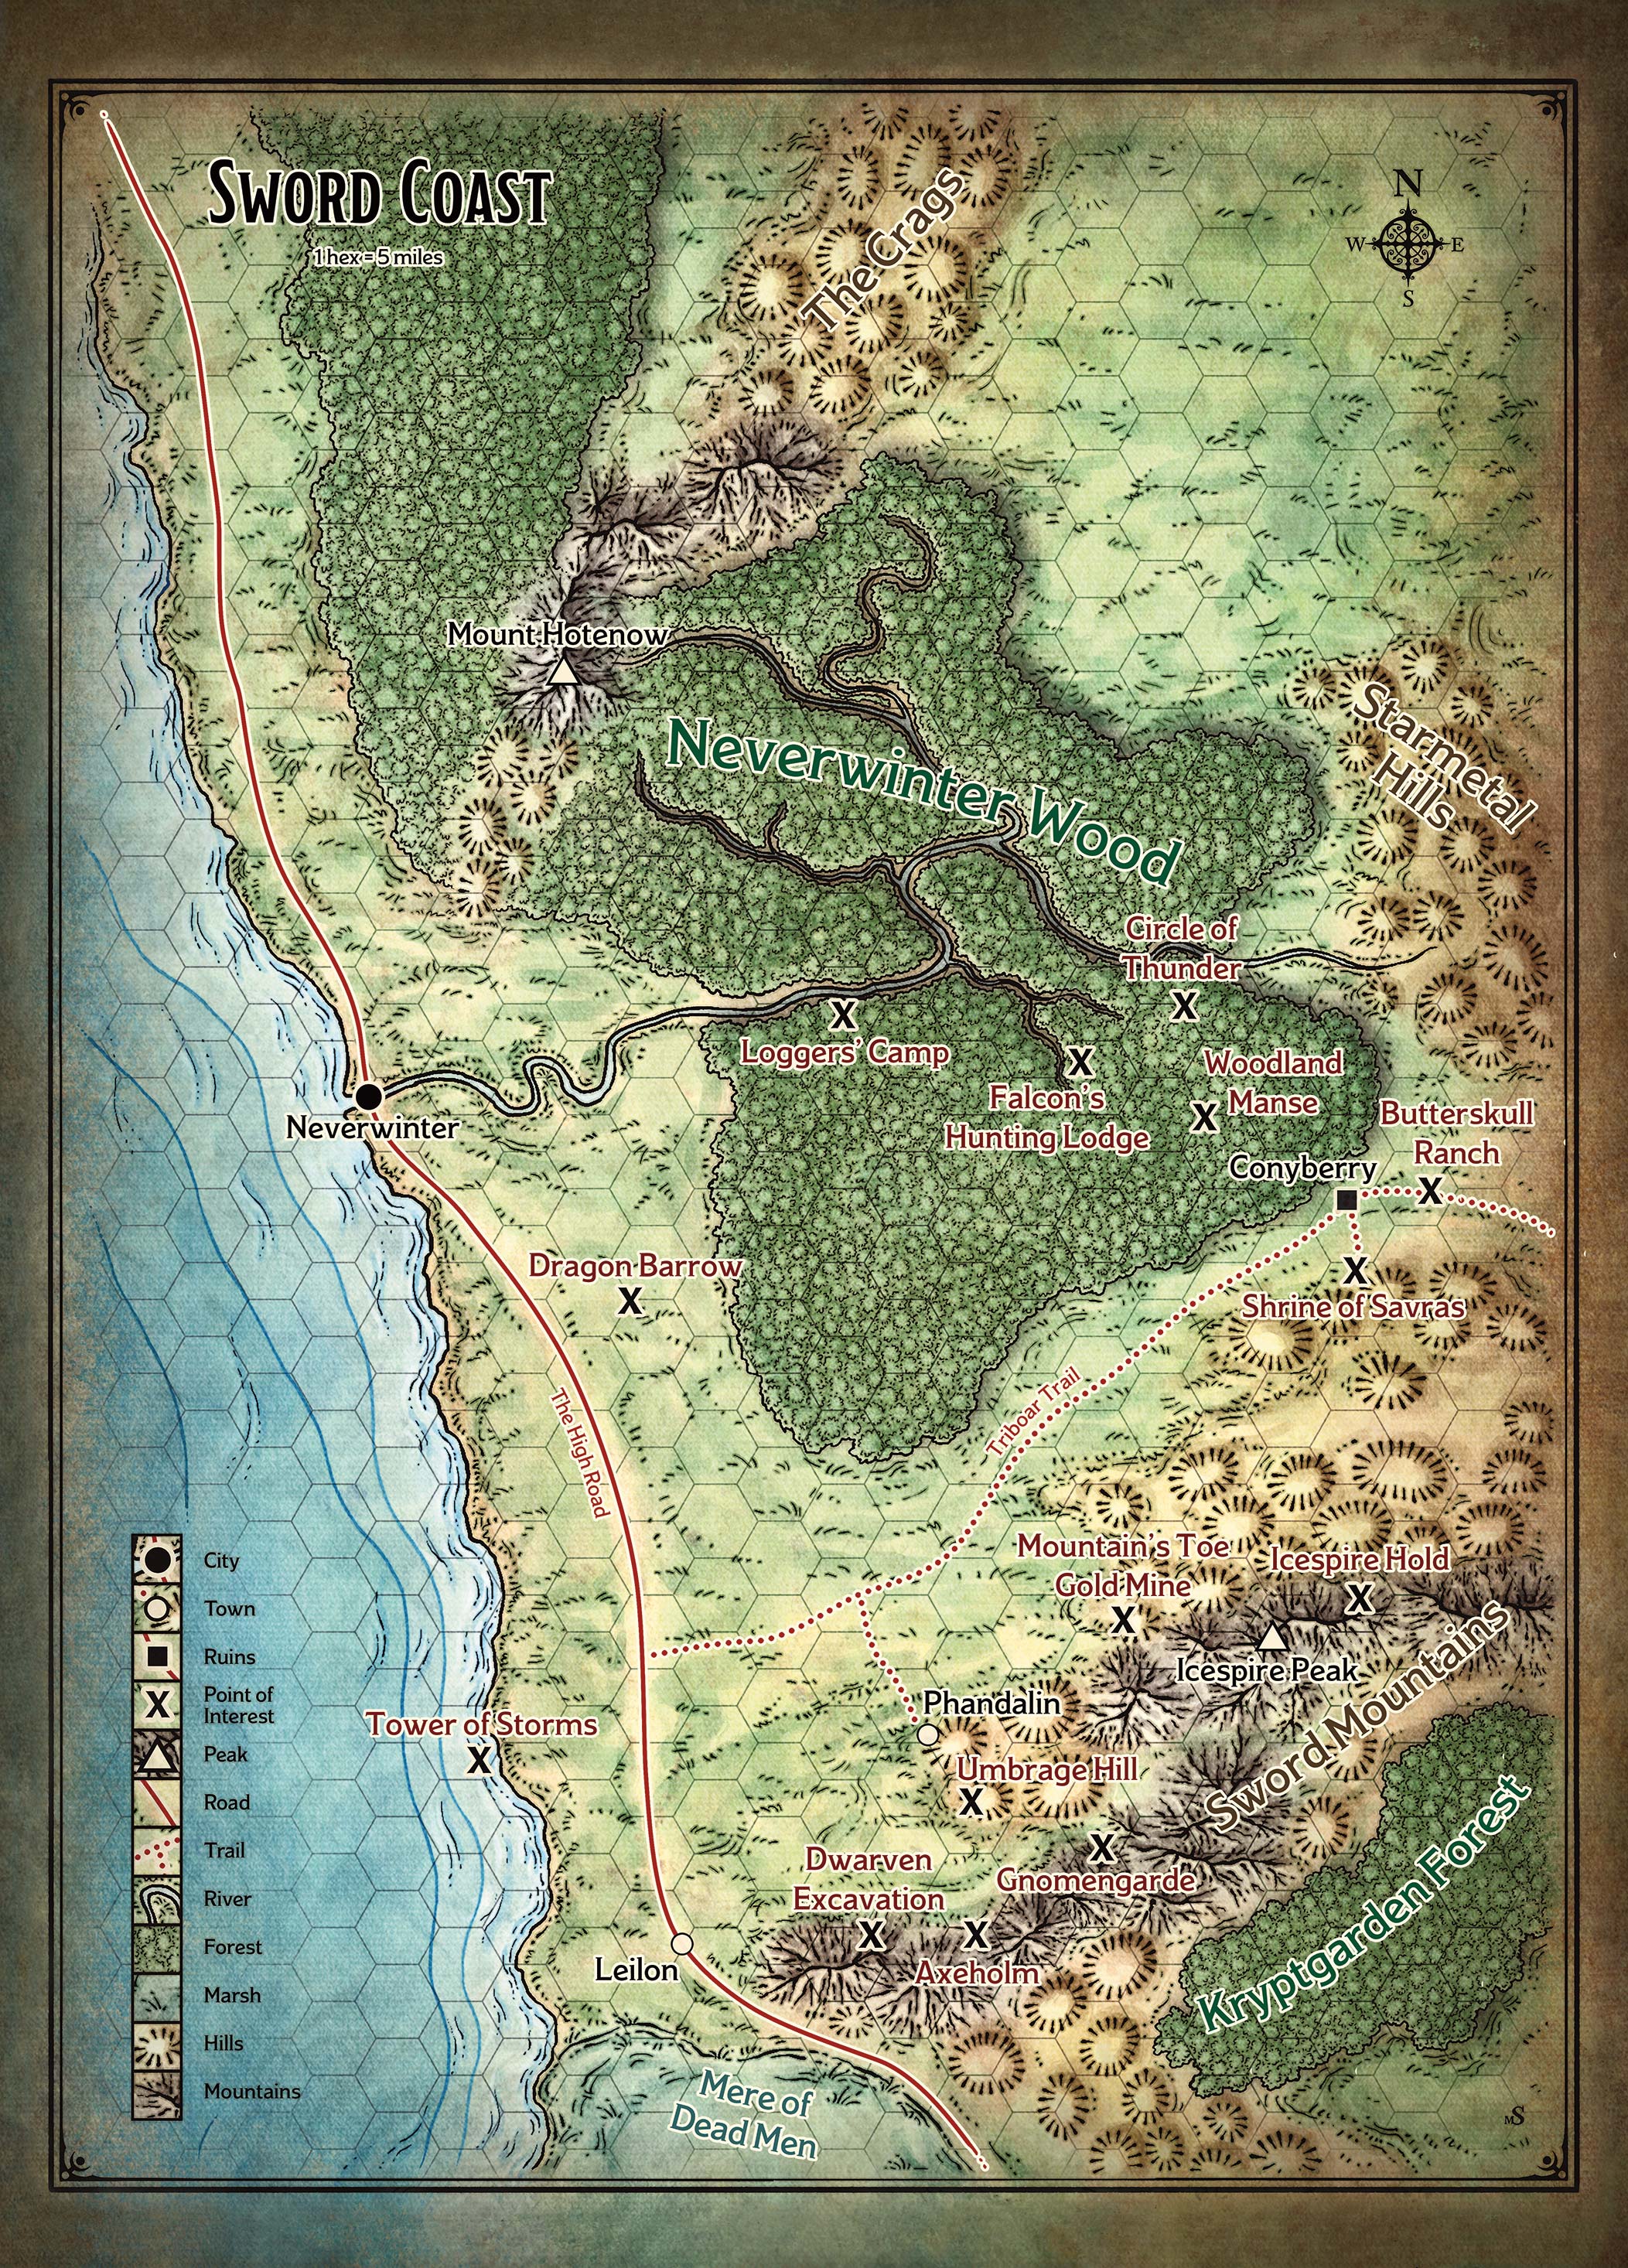
Map of the Sword coast
The map below shows a region of the Forgotten Realms called the Sword Coast. This is a place of adventure, where daring souls delve into ancient strongholds and explore the ruins of long-lost kingdoms. Amid a lawless wilderness of jagged, snow-capped peaks, alpine forests, bitter winds, and roaming monsters, the coast holds such great bastions of civilization as the city of Neverwinter, in the shadow of the fuming volcano known as Mount Hotenow.
This map is for the DM's eyes only, as it indicates the locations of places described later in this adventure. A larger, player-friendly version of the map appears on one side of the poster map included with this adventure. The poster map of the Sword Coast can be shared freely with the players as their characters explore the region.
Geographical locations marked on both the DM's map and the players' map are described below in alphabetical order. This information is not secret, and can be shared with players if they request details about a particular location.
Conyberry
The Triboar Trail runs right through this abandoned town, which was sacked by barbarians years ago and now lies in ruins. A dirt road extending south of the town leads to a supposedly abandoned shrine dedicated to Savras (god of divination and fate). For more information on this location, see "
Shrine of Savras."
Crags
These rocky, windswept hills are dotted with old mines that have become infested with monsters.
High Road
This highway hugs the coast, connecting Neverwinter to the coastal cities of Luskan to the north and Waterdeep to the south. For years, the stretch of road south of Neverwinter fell into disuse because of frequent monster attacks. Of late, efforts have been made to keep the road safe, with light patrols of guards on horseback moving between Neverwinter and Leilon.
Kryptgarden Forest
This ancient forest tucked behind the Sword Mountains contains the ruins of bygone dwarven civilizations.
Leilon
This small town along the High Road is in the midst of rebuilding itself after being abandoned for years. Its inhabitants hail from Neverwinter and are in the paid service of the city's Lord Protector, who has tasked them with turning Leilon into a fortified settlement that can ward off threats from the Mere of Dead Men.
Mere of Dead Men
Travelers on the High Road, which skirts the mere to the east, must resist being lured into this cold and desolate swamp by bobbing will-o'-wisps. Countless adventurers have perished in the mere, drawn by tales of ruined castles half-sunk in the mire.
Neverwinter
This city was badly damaged when Mount Hotenow erupted some fifty years ago. Now, the City of Skilled Hands works to rebuild under the watchful eye of its Lord Protector, Dagult Neverember, who rules in the absence of an heir to Neverwinter's crown. At present, no legitimate heirs to the old Alagondar royal line are known to exist, and many believe that the line is ended. Lord Neverember, taking no chances, quietly pays off or disposes of anyone claiming a connection to the rulers of old.
Neverwinter Wood
The forest east of Neverwinter seems to have a magical quality about it, or at least an air of mystical secrecy. Reclusive spellcasters are rumored to dwell deep within.
This nondescript mining settlement, nestled in the foothills of the Sword Mountains, serves as the starting location for the adventure. For more information, see "
Welcome to Phandalin."
Starmetal Hills
This range of rocky knolls is so named because the area has been the impact site of a number of meteor showers over millennia. The hills are haunted by ruthless barbarian tribes, giving others little reason to visit the area.
Sword Mountains
These steep, craggy, snow-capped mountains are home to scattered tribes of orcs as well as other monsters. Icespire Peak is the tallest among them. Their foothills are strewn with the ruins of bygone kingdoms, and more than a few half-forgotten dungeons and tombs.
Triboar Trail
This path south of Neverwinter Wood is the safest route between Neverwinter and the town of Triboar, located in the Dessarin Valley to the east (off the map). The trail is not patrolled, and monster attacks are commonplace.
First Session: Character Creation
Dungeons & Dragons is a game that requires several hours to play, but you can stop the game at any time and continue it later. The first session should focus on character creation - one of the most fun aspects of the game. If the players create and equip their characters with time to spare, you can begin the adventure once they're ready to go. Otherwise, congratulate them on building their characters and begin the adventure with the next session.
During character creation, your role as the DM is to let your players build the characters they want, and to help them come up with explanations for how their characters came together to form an adventuring party. If you have only one player, work with that player to come up with their character's backstory, then let the player decide if they want the character to have a sidekick (see "
Running for One Player" below).
Character Options
Each player has options when it comes to choosing a character race, class, and background. These options are summarized in the Character Options table. If there are multiple players in the group, encourage them to choose different classes so that the party has a range of abilities. It's less important that the party include multiple races or backgrounds, as sometimes it's fun to play an all-dwarf party or a troupe of adventuring entertainers.
Character Options
| Races | Classes | Backgrounds |
|---|
| Dwarf | Bard | Acolyte |
| Elf | Cleric | Criminal |
| Halfling | Fighter | Entertainer |
| Human | Rogue | Sage |
| - | Wizard | Soldier |
While your players follow the steps of character creation as outlined in the rulebook, pay attention to the choices they make. The backgrounds they choose define who their characters were before becoming adventurers, and also include roleplaying hooks in the form of ideals, bonds, and flaws - things that you, as the DM, want to know. For example, if a player chooses the Criminal background, one of the options for the character's bond is, "I'm trying to pay off an old debt I owe to a generous benefactor." If that's the character's bond, work with the player to decide who that generous benefactor is.
Running for Multiple Players
If you have two or more players, the easiest way to start the adventure is to assume that the characters know each other and have some sort of history together, however brief that history might be. The characters might have met in Neverwinter and traveled to Phandalin together, or they might have arrived in Phandalin separately and gotten to know each other while staying at the local inn.
Questions to Ask
Here are some questions you can ask the players as they create characters:
- Are any of the characters related to each other?
- What keeps the characters together as a party?
- What does each character like most about every other member of the adventuring party?
Running for One Player
If you're running this adventure for a single player, you can give that player a sidekick as a secondary character. Let the player choose one of the pregenerated sidekicks from the selection of Sidekick Cards. Rules and stat blocks for sidekicks appear in the rulebook. You might need to help the player run the sidekick for the first few sessions. If a sidekick is lost or no longer needed, the character can return to Phandalin and acquire a new one.
Using Sidekicks
Make sure the player understands the roles and limitations of sidekicks in this adventure:
- Sidekicks are stalwart companions who can perform tasks both in and out of combat, including things such as setting up camp and carrying gear.
- Ideally, a sidekick's abilities should complement those of the main character. For example, a spellcaster makes a good sidekick for a fighter or rogue.
Reading Ahead
As the players familiarize themselves with the character options and adventuring gear described in the rulebook, take advantage of the opportunity to read ahead.
"The Adventure Begins" section tells you everything you need to know about what's happening in and around Phandalin. It also describes quests that characters can pursue, leading them to other locations. The adventure is built around these quests. Hopefully, the characters will find them tempting enough to undertake.
GLOSSARY
The adventure uses terms that might be unfamiliar to you. A few of these terms are described here. For descriptions of rules-specific terms, see the rulebook.
Characters. This term refers to the adventurers run by the players. They are the protagonists in any D&D adventure. A group of characters or adventurers is called a party.
Nonplayer Characters (NPCs). This term refers to characters run by the DM. How an NPC behaves is dictated by the adventure and by the DM.
Boxed Text. At various places, the adventure presents descriptive text that's meant to be read or paraphrased aloud to the players. This read-aloud text is offset in boxes. Boxed text is most commonly used to describe locations or present bits of scripted dialogue.
Stat Block. Any monster or NPC that is likely to be involved in combat requires game statistics so that the DM can run it effectively. These statistics are presented in a format called a stat block. You'll find the stat blocks needed for this adventure in the "Creatures" section.
Tenday. In the Forgotten Realms, a week is ten days long and called a tenday. Each month consists of three tendays - thirty days total.
The Adventure Begins
The adventure begins in the mining town of Phandalin. There, the characters receive quests and can choose which ones to pursue.
The "Adventure Background" section describes the events leading up to the adventure and the main threats the characters will face. The "Welcome to Phandalin" and "Exploring Phandalin" sections describe the town where the adventure begins. Knowing Phandalin well will ensure a smooth start.
Adventure Background
Driven from lands farther north by more powerful dragons, a young white dragon named Cryovain has descended upon the Sword Mountains, claiming the snow-capped range as its domain. Typical of its kind, Cryovain is dim-witted and cruel. The dragon patrols the skies around Icespire Peak, surveying its territory while hunting for food and easy treasure. With each passing day, the dragon's domain grows as it ranges farther across the land, preying on anything it can catch with its claws or freeze to death with its icy breath. Sightings of the dragon are becoming more common, as are its attacks.
A crumbling fortress on the northeast spur of Icespire Peak serves as the dragon's lair. Cryovain seized the icy fortress from a tribe of savage orcs, killing the orc war chief and forcing the tribe's survivors to flee into the foothills and forests. Enraged by the death of their war chief, the orcs have called upon ancient allies - evil, shapechanging, half-orc spellcasters who bless and advise them. These half-orcs worship Talos, an evil god of storms, and many dwell in the dark depths of Neverwinter Wood. In stormy weather, they gather on remote hilltops to summon Gorthok the Thunder Boar, a primal entity that serves Talos. Like the god it serves, Gorthok delights in destruction.
The orcs aren't the only creatures thrown into upheaval by Cryovain's sudden arrival. A manticore driven from its mountaintop nest by the roaming white dragon has migrated to the foothills and begun terrorizing folk living on the outskirts of the mining town of Phandalin. Other monsters in the region have been similarly displaced.
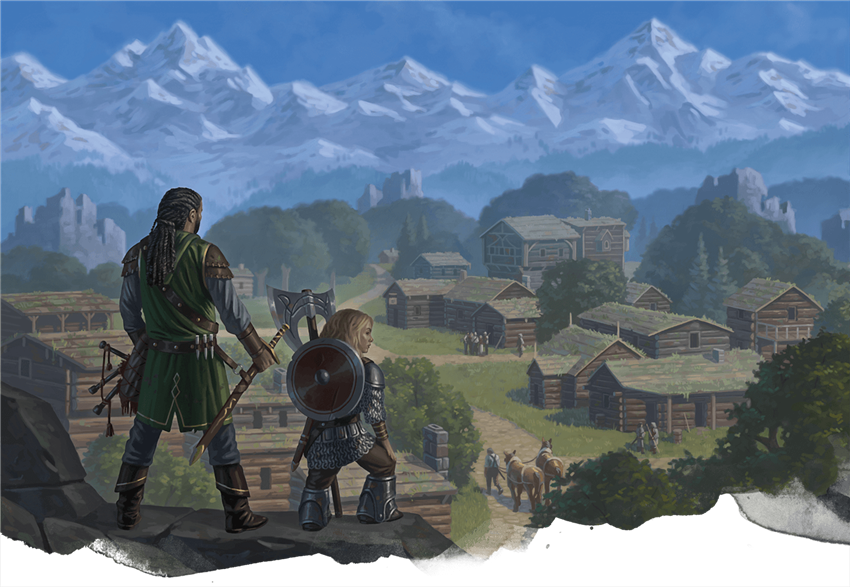
Welcome to Phandalin
The frontier town of Phandalin is built on the ruins of a much older settlement. Hundreds of years ago, the old Phandalin was a thriving human town whose people were firmly allied with neighboring dwarves and gnomes. Then an orc horde swept through the area and laid waste to the settlement, and Phandalin was abandoned for centuries.
In the last three or four years, settlers from the cities of Neverwinter and Waterdeep have begun the hard work of reclaiming the ruins of Phandalin. The new settlement is home now to farmers, woodcutters, fur traders, and prospectors drawn by stories of gold and platinum in the foothills of the Sword Mountains. The arrival of a white dragon threatens to destroy all that they've worked to rebuild.
When you are ready for the adventure to get underway, show the poster map of Phandalin to the players and read the following boxed text aloud:
Nestled in the rocky foothills of the snow-capped Sword Mountains is the mining town of Phandalin, which consists of forty or fifty simple log buildings. Crumbling stone ruins surround the newer houses and shops, showing how this must have been a much larger town in centuries past.
Phandalin's residents are quiet, hard-working folk who came from distant cities to eke out a life amid the harsh wilderness. They are farmers, stonecutters, blacksmiths, traders, prospectors, and children. The town has no walls and no garrison, but most of the adults keep weapons within easy reach in case the need for arms should arise.
Visitors are welcome here, particularly if they have coin to spend or news to share. The
Stonehill Inn at the center of town offers modest lodging and meals. A couple of doors down from the inn, posted outside the
townmaster's hall, is a job board for adventurers.
When the adventurers are ready to inspect the job board, proceed to the "
Townmaster's Hall" section.
Exploring Phandalin
The characters might wish to explore key establishments within Phandalin. These locations are marked on the map of Phandalin and the corresponding poster map.

Stonehill Inn
This modest, two-story roadhouse has six rooms for rent on the upper floor. A bed for the night costs 5 sp, while a meal costs 1 sp. The proprietor is a short, friendly male human named Toblen Stonehill. Toblen is a native of the town of Triboar to the east. He came to Phandalin to prospect, but soon realized that he knew a lot more about running an inn than he did about mining. If the characters talk to Toblen, he shares a brief tale told to him by one of his regular patrons. Roll a d6 and consult the
Phandalin Tales table to determine which tale Toblen knows, or pick a tale the characters haven't heard yet.
Barthen's Provisions
The shelves of this general store stock most ordinary goods and supplies, including backpacks, bedrolls, rope, and rations. Barthen's doesn't stock weapons or armor, but characters can purchase other adventuring gear here, with the exception of items that cost more than 25 gp. (For prices, see the rulebook.) Characters in need of weapons or armor are directed to the
Lionshield Coster. Those looking to buy potions of healing are urged to visit Adabra Gwynn at Umbrage Hill (see the "Potions of Healing" sidebar).
The proprietor, Elmar Barthen, is a lean and balding human man of fifty years. He employs a couple of young clerks (Ander and Thistle) who help load and unload wagons, and who wait on customers when Barthen isn't around. Characters who engage Barthen, Ander, or Thistle in friendly conversation are told a tale. Roll a d6 and consult the
Phandalin Tales table, or pick a tale the characters haven't heard yet.
Lionshield Coster
Hanging above the front door of this modest trading post is a sign shaped like a wooden shield with a blue lion painted on it.
This building is owned by the Lionshields, a merchant company based in the city of Yartar over a hundred miles to the east. The company ships finished goods to Phandalin and other small settlements throughout the region.
The master of the Phandalin post is a sharp-tongued human woman of thirty-five named Linene Graywind. Linene keeps a supply of armor and weapons, all of which are for sale to interested buyers. (For prices, see the rulebook.) Linene won't sell weapons to anyone she thinks might be a threat to the town. If the characters talk to her, she recalls a tale told to her by one of her neighbors. Roll a d6 and consult the
Phandalin Tales table, or pick a tale the characters haven't heard yet.
Phandalin Miner's Exchange
Miners come here to have their valuable finds weighed, measured, and paid out. The exchange also serves as an unofficial records office, registering claims to various streams and excavations around the area. Enough wealth is hidden in the nearby streams and valleys to support a good number of independent prospectors.
The exchange is a great place to meet people who spend a lot of time out and about in the countryside surrounding Phandalin. The guildmaster is a calculating human woman named Halia Thornton. She is also an agent of the Zhentarim, a shadowy organization that seeks to exert secret control over the North through wealth and influence. Halia is working slowly to bring Phandalin under her control, and she can become a valuable patron to adventurers who don't cross her. If the characters get on her good side, Halia tells them a tale. Roll a d6 and consult the
Phandalin Tales table, or pick a tale the characters haven't heard yet.
Shrine of Luck
Phandalin's only temple is a shrine made of stones taken from the nearby ruins. It is dedicated to Tymora (goddess of luck and good fortune) and is normally in the care of a zealous elf acolyte named Sister Garaele. However, she is out of town for the duration of this adventure.
Sister Garaele is a member of the Harpers, a scattered network of adventurers and spies who advocate equality and covertly oppose the abuse of power. The Harpers gather information throughout the land to thwart tyrants. They aid the weak, the poor, and the oppressed. Sister Garaele regularly reports to her superiors on events in and around Phandalin, and is currently in Neverwinter doing exactly that. In her absence, the shrine is left untended.
Phandalin Tales
| d6 | Tale |
|---|
| 1 | "Once again, the orcs have come down from the mountains to prey on the lowlands! If Neverwinter doesn't send help soon, the orcs will overrun Phandalin and destroy everything we've worked so hard to rebuild." |
| 2 | "As the Triboar Trail runs east, it passes through the ruins of Conyberry, a town sacked by barbarians years ago. There's a ruined temple south of Conyberry where it's said the locals hid their gold." (If the characters visit the temple, see "Shrine of Savras".) |
| 3 | "Strange magic pervades Neverwinter Wood, confounding navigators and obscuring the ancient ruins of bygone kingdoms lost in its depths." |
| 4 | "Falcon's Hunting Lodge is the only safe haven in Neverwinter Wood. It lies deep in the forest along a river's edge, and wealthy nobles venture there to hunt while under Falcon's protection. Falcon is a retired veteran of many wars, and it's said he'll offer free room and board to anyone who brings him a bottle of wine." (If the characters pay Falcon a visit, see "Falcon's Hunting Lodge".) |
| 5 | "West of Phandalin, on the coast, is an old stone lighthouse. Ships are drawn to this gleaming tower like moths to a flame, and are doomed to crash upon its rocks. Their wrecks must be filled with treasure!" (If the characters visit the lighthouse, see "Tower of Storms".) |
| 6 | "Some folk claim to have seen a dragon flying through the high clouds. At that distance, it's hard to gauge the creature's size, but some say it's as big as an elephant and has gleaming white scales." |
Townmaster's Hall
The townmaster's hall has sturdy stone walls, a pitched wooden roof, and a bell tower at the back. The job board next to the front door features a sparse number of notices, all written in Common and in the same hand.
If the characters inspect the notices on the job board, proceed to the "
Phandalin Quests" section.
POTIONS OF HEALING
No place in Phandalin sells potions of healing. However, characters who wish to purchase one or more such potions can do so at the Umbrage Hill windmill, located a few miles south of Phandalin. The windmill is home to a midwife and acolyte of Chauntea (goddess of agriculture) named Adabra Gwynn. For more information on this location, see "Umbrage Hill".
Phandalin Quests
The job board outside the
townmaster's hall is where adventurers can learn about quests. Each quest is printed on a card, which you can give to the players when that quest becomes available (see "
Starting Quests" and "Follow-Up Quests" below). Let the players choose which quest to complete first, second, third, and so on. If the players don't like a particular quest, they are under no obligation to complete it. However, completing quests helps the characters become more powerful (see "Leveling Up").
Harbin Wester, Quest Giver
All the notices on the job board are written by Harbin Wester, Phandalin's duly appointed townmaster. Harbin is a pompous, middle-aged banker who lives in a house east of the
townmaster's hall. Reports of a white dragon in the area have turned him into a veritable shut-in, and he rarely goes outside except to get food and post new notices calling for adventurers.
Characters who knock on Harbin's door hear his voice on the other side say, "If you're a dragon, know that I'm far too thin and bony to make a good meal!" No matter what the adventurers do to allay his fears, Harbin refuses to open the door, preferring to talk through it. Other residents who trouble Harbin with complaints receive similar treatment.
If the characters ask him about a quest, Harbin sets them on the right track, offering payment upon their return. When the time comes to pay up, he slips the payment under the door one gold coin at a time.
ADVENTURE LOCATIONS AND ENCOUNTERS
This adventure encourages characters to explore locations marked on the DM's map of the Sword Coast. When the characters embark on a journey to a location, flip to the section of this book that describes that location in detail. For example, if the players choose to undertake the Umbrage Hill Quest, go to the "Umbrage Hill" section. Each location includes an overview that briefly describes what characters can expect to find there. This overview is followed by information you'll need to run the encounters at that location.
Running Encounters. This adventure describes what the characters see when they first arrive at a location, and what they'll discover as they explore it. The adventure also tells you how the location's inhabitants react to the characters' arrival.
No encounter has a predetermined outcome. For example, characters who explore Umbrage Hill are likely to encounter a manticore. Although fighting the monster is always an option, characters might decide to negotiate with the manticore instead. Be flexible, particularly when dealing with intelligent monsters. If every encounter becomes a fight to the death, your players might get bored and miss out on some fun roleplaying opportunities. Whenever possible, reward players for being clever. For example, characters who disturb the ankhegs at the Loggers' Camp might be able to escape from the burrowing monsters by jumping in the nearby river. Similarly, characters who are willing to negotiate with the wererats in the Mountain's Toe Gold Mine might be able to forge a truce between the wererats and the miners, ending their conflict so that the mine can be reopened.
Starting Quests
When the characters first visit the job board, there are three quests posted. Give the players the cards for these quests so that they can choose which to pursue.
Dwarven Excavation Quest. "Dwarf prospectors found ancient dwarven ruins in the mountains southwest of here, and have been working an archaeological dig seeking treasure and relics. They need to be warned that a white dragon has moved into the area. Take the warning to them, then return to Townmaster Harbin Wester to collect a reward of 50 gp." If the characters undertake this quest, see "
Dwarven Excavation."
Gnomengarde Quest. "A clan of reclusive rock gnomes resides in a small network of caves in the mountains to the southeast. The gnomes of Gnomengarde are known for their magical inventions, and they might have something with which to defeat the dragon. Get whatever you can from them. If you bring back something useful and don't want to keep it for yourselves, Townmaster Harbin Wester will pay you 50 gp for it." If the characters undertake this quest, proceed with "
Gnomengarde."
Umbrage Hill Quest. "The local midwife - an acolyte of Chauntea named Adabra Gwynn - lives by herself in a stone windmill on the side of a hill a few miles south of Phandalin. With dragon sightings becoming more common, it's not safe for her to be alone. Urge Adabra to return to Phandalin. Once she's safe, visit Townmaster Harbin Wester to claim a reward of 25 gp." If the characters undertake this quest, proceed with "
Umbrage Hill."
Follow-Up Quests
After the characters complete two
starting quests, the following three quests are added to the job board:
Butterskull Ranch Quest. "Orcs have attacked Butterskull Ranch, five miles east of
Conyberry along the Triboar Trail! Travel there with haste, assess the damage, and help any way you can. Ranch owner Alfonse "Big Al" Kalazorn is a retired sheriff who can reward you for your efforts. If he's dead, return to Townmaster Harbin Wester with proof of Kalazorn's demise to receive a reward of 100 gp." If the characters undertake this quest, proceed with "Butterskull Ranch."
Loggers' Camp Quest. "Deep in Neverwinter Wood, along the river that flows west toward Neverwinter, is a logging camp. Every two months, Phandalin delivers fresh supplies to the camp, which is run by the half-brother of Phandalin's townmaster, Harbin Wester. Barthen, the local provisioner, has prepared a new delivery. He needs someone to bear the supplies safely to the camp. Return to Harbin Wester with a notice of delivery signed by his half-brother, Tibor Wester, to claim your reward of 100 gp." If the characters undertake this quest, proceed with "Loggers' Camp."
Mountain's Toe Quest. "The Mountain's Toe Gold Mine lies fifteen miles northeast of Phandalin. The new overseer, Don-Jon Raskin, just made the trip from Neverwinter to Phandalin and needs to be escorted to the mine. There's no telling what dangers lie between here and there. Once you deliver Raskin safe and sound, return to Townmaster Harbin Wester to collect a reward of 100 gp." If the characters undertake this quest, proceed with "Mountain's Toe Gold Mine."
After the characters complete two follow-up quests, another three follow-up quests are added to the job board:
Axeholm Quest. "Within a mountain fifteen miles south of Phandalin stands the ancient dwarven fortress of Axeholm, which has been sealed for years. If a dragon attack is imminent, the people of Phandalin might need to evacuate and take refuge in Axeholm. To that end, someone needs to open the fortress and make it safe for habitation. Once you accomplish these tasks, return to Townmaster Wester to collect a reward of 250 gp." If the characters undertake this quest, proceed with "Axeholm."
Dragon Barrow Quest. "The dragon that besets us is not the first to threaten this region. Between here and Neverwinter lies the barrow mound of a warrior whose magical dragon-slaying sword helped fell a green dragon terrorizing the High Road a century ago. Rumor has it the dragon slayer sword is buried there too. Retrieve it, and let the sword be its own reward!" If the characters undertake this quest, proceed with "Dragon Barrow."
Woodland Manse Quest. "The orcs have fallen under the sway of evil spellcasters in Neverwinter Wood, and have been sighted in growing numbers near Falcon's Hunting Lodge. The spellcasters dwell in a ruined manse. Falcon needs someone to make a preemptive strike against it. Destroy the evil in the manse, then expect him to reward you." If the characters undertake this quest, run "Falcon's Hunting Lodge" followed by "Woodland Manse."
Leveling Up
Characters advance in level by completing quests, using the guidelines for leveling up in the rulebook. Regardless of the number of characters in the party, the rate of advancement is as follows:
- Characters gain a level each time they complete a starting quest, until they reach 3rd level. Once they are 3rd level or higher, completing a starting quest has no effect on their level.
- Characters gain a level each time they complete two follow-up quests.
- Characters gain a level if they slay Cryovain the white dragon.
Where's the White Dragon?
Cryovain the young white dragon is a roaming threat that can be encountered almost anywhere. Each time the characters arrive at a location tagged on the map of the Sword Coast or prepare to leave that location, roll a d20 and consult the Dragon's Location table to determine Cryovain's current whereabouts. Make your first roll on the table when the adventurers leave Phandalin for the first time.
When the dragon visits a location that is not its lair, it surveys the location from the sky, beyond the reach of ranged weapon attacks. If it spots nothing it can eat, it flies off after circling the location for a minute or two. If it spots something tasty, such as a mule, a horse, or a character, the dragon swoops down and attacks it. Once the dragon kills something, it grabs the carcass and flies off with it. Whatever it takes is then eaten within the hour.
If Cryovain loses more than 10 hit points in battle, the dragon disengages from combat and retreats to its lair at Icespire Hold, remaining there until it finishes a long rest and regains all its hit points. Only at Icespire Hold does the dragon fight to the death.
Dragon's Location
DWARVEN EXCAVATION
"Dwarven Excavation" is balanced for characters of 1st level, though even characters of 2nd level will find certain elements of the quest challenging. Characters of 3rd level or higher should have an easy time clearing out the ruins and defeating the orcs that arrive later.
Location Overview
Dazlyn Grayshard and Norbus Ironrune are shield dwarf prospectors and business partners. While looking for gold in the mountains southwest of Phandalin, they decided to explore a nearby canyon and found evidence of an ancient dwarven settlement buried by an avalanche. They've spent the past several months clearing the rubble and scouring the ruins for treasure, but have found nothing of value so far.
Behind the settlement, carved into the back wall of the canyon, is an old temple of Abbathor, the evil dwarven god of greed. During solar eclipses, Abbathor is appeased with sacrifices of blood and gemstones. On one occasion, the god found the sacrifices of this temple's priests lacking, so he caused an earthquake and avalanche that collapsed parts of the temple and buried the settlement. The priests in the temple who were not killed outright were transformed into ochre jellies - debased reflections of Abbathor's hunger and greed.
Quest Goals
To complete the Dwarven Excavation Quest, the adventurers need only to warn Dazlyn and Norbus of the white dragon. The grateful dwarves then tempt the adventurers with a quest of their own, offering their pair of sending stones as a reward if the characters rid the temple of the monsters within. If they stay long enough to help Dazlyn and Norbus, the characters encounter orcs before they leave (see "When Orcs Attack").
Arrival
The dwarven excavation lies due east of Leilon, 15 miles southwest of Phandalin, at the eastern end of a canyon (area E1). When the characters reach area E1 on the map, read the following boxed text aloud:
The canyon's rocky walls rise to a height of eighty feet. At the end of the canyon, a twenty-foot-high wall of black stone has a broken gate carved into it, with one stone door hanging precariously by a hinge and the other door missing. Beyond this open gate, in the shadow of a great mountain to the east, lies a ruined settlement. All is quiet.
If the characters announce their arrival, Dazlyn and Norbus come forth to greet them. Otherwise, the characters encounter the dwarves in area E3.
Excavation Locations
The following locations are keyed to the map of the dwarven excavation.

E1. Canyon
The canyon floor is strewn with rubble and bereft of vegetation except for a few tough, scraggly weeds.
E2. Ruined Settlement
All knowledge of this settlement, including its name, vanished along with its original inhabitants, who were killed by an avalanche. The rubble that once buried the settlement has been hauled away, leaving the outlines of stone buildings visible as collapsed walls. A stone well on the far side of the ruins is filled with rubble.
The settlement has been thoroughly ransacked. Characters who search the ruins find a few crushed dwarf bones and signs of recent campfires, but nothing of value.
E3. Courtyard and Temple Facade
Describe this location as follows:
A partially collapsed, ten-foot-high wall separates this courtyard from the settlement west of it. Three heaps of rubble are piled high in this area. Hewn from the canyon's back wall, a thirty-foot-high temple facade features steps rising to a stone platform. Cut into this facade is a ten-foot-high open doorway flanked by crumbling, life-sized granite statues of cloaked dwarves. Evil grins can be seen on their weatherworn faces.
If they haven't been encountered yet, Dazlyn and Norbus are eating rations behind the easternmost rubble pile while keeping an eye on the temple entrance (area E4). Each is a shield dwarf commoner who speaks Common and Dwarvish, and who has darkvision out to a range of 60 feet. Dazlyn is forthright and honest to a fault. Norbus is gruff and excessively cautious. They banter like an old married couple.
Each dwarf has ten days of rations, a waterskin, mining tools, and one of two matching sending stones. The dwarves offer these magic items to anyone willing to kill the ochre jellies in area E5, search the temple for other obvious threats, and make it safe. If the characters obtain these stones, give the players both Sending Stone cards or they can reference them in the Magic Items Listing. Eager to resume their excavation, the dwarves offer to split what they find with characters who help them.
TEMPLE FEATURES
The temple (areas E4 through E11) is smoothly hewn from solid rock. The following features are common throughout.
Ceilings. Ceilings throughout are 10 feet high and flat.
Doors. All doors are made of carved stone with stone pins for hinges. Secret doors blend in with the surrounding stonework. Finding a secret door requires a search of the wall and a successful DC 15 Wisdom (Perception) check. Dazlyn and Norbus have found one secret door thus far, in area E4. The others have yet to be discovered.
Dust and Debris. The temple is choked with dusty rubble. Rubble-filled squares are difficult terrain (see the rulebook).
Light. There are no light sources in the temple, since the dwarf priests of Abbathor relied on darkvision to see.
E4. Dusty Foyer
Spikes hammered into the floor hold open two sets of double doors. A once-secret door to the north stands open, with a room beyond it holding nothing but rubble.
E5. Temple
This area contains five secret doors, including one that opens up into one of the stone pillars holding up the ceiling. A bloodstained limestone altar stands at the far end of the room. Dazlyn and Norbus got this far into the temple before an ochre jelly scared them off. It clings to the ceiling above the altar. If the party includes two or more characters (not counting sidekicks), a second ochre jelly clings to the south wall.
Treasure. The secret door in the pillar conceals a cavity packed with dwarf skulls that tumble out when the door is opened. At the bottom of the cavity is an unlocked stone coffer containing 15 gemstones worth 10 gp each.
E6. Partially Collapsed Room
An earthquake collapsed part of this room, which holds nothing of value.
E7. Secret Tunnel
Trapped behind the secret doors, an ochre jelly lurks in the rubble at the south end of this hall.
E8. Priests' Bedchamber
Three stone bed frames stand against the east wall.
E9. Vestry
An empty stone font juts out of the southwest wall. A stone wardrobe against the east wall holds the rotted remains of two suits of red leather armor (vestments worn by priests of Abbathor, now ruined and worthless).
E10. Partially Collapsed Room
Half-buried in the rubble here is the skeleton of a dwarf priest wearing rotted red leather armor. The dwarf was killed when part of the room collapsed.
Treasure. Around the skeleton's neck hangs a holy symbol of Abbathor: a tiny jeweled dagger on a silver chain. The symbol is inscribed with Dwarvish runes that translate to "Greed is good," and is worth 50 gp.
E11. Hall of Greed
To reach this room, the characters must clear away the rubble that seals it off, which takes a single character 40 hours. Multiple characters working together can reduce the time proportionately.
An alcove in the south wall holds the rubble of a shattered statue. An alcove to the north holds a statue of a dwarf with horns, which stares greedily at a glowing green gem in its hands. If the gem is taken, it turns to dust and the statue explodes. Any creature within 10 feet of the exploding statue must make a DC 15 Dexterity saving throw, taking 22 (4d10) piercing damage on a failed save, or half as much damage on a successful one.
When Orcs Attack
Orcs arrive at area E1 as the characters conclude their business with the dwarves. The number of orcs is equal to the number of characters in the party, including sidekicks. Driven from their territory by Cryovain, the orcs are looking for a new lair and fight to the death.
GNOMENGARDE
"Gnomengarde" is balanced for characters of 1st level, though characters of 2nd level might find certain traps and hazards challenging. Characters of 3rd level or higher should be able to deal with the unexpected trouble here and get what they need from the rock gnomes without having to expend many resources, though the roleplaying in this quest should be fun regardless.
Location Overview
The caves of Gnomengarde are carved into the base of a mountain southeast of Phandalin, around a narrow waterfall. The rock gnome wizards who occupy these caves form strategic alliances with their human and dwarf neighbors as needs warrant. Reclusive and secretive, the gnomes craft minor magic items and useful, nonmagical inventions to pass the time. In these endeavors, their failures outnumber their successes. They seldom stray far from home, subsisting largely on the mushrooms that grow on misty islands outside their caves.
Gnomengarde has two married kings who rule in tandem - Gnerkli and Korboz. Korboz recently lost his mind and is keeping Gnerkli as his prisoner. Their subjects don't understand the nature of Korboz's affliction, and are at a loss as to what to do. They wish no harm to befall either king, but they acknowledge that Korboz has become a danger to himself and others.
In addition to the danger posed by the mad king, two gnomes have mysteriously vanished within the last tenday. No one except King Korboz knows that a shapechanging monster (a mimic) has crept into Gnomengarde and is feeding on the gnomes, changing its appearance as it makes its way through the complex. Korboz was attacked and almost killed by the creature, with that event inspiring his madness. He has sequestered himself and his beloved Gnerkli in their quarters because he doesn't want the monstrous shapechanger to devour them. Korboz hopes the creature will tire of eating gnomes and leave. Providing Korboz with evidence of the mimic's demise restores his sanity.
GNOMENGARDE FEATURES
Gnomengarde's caves are hewn from solid rock and share the following features.
Ceilings. Ceilings throughout are 7 feet high and flat.
Doors. Normal doors are made of wood fitted with rusty iron handles and hinges. A locked door can be opened with a successful DC 10 Dexterity check using thieves' tools. A locked door can be forced open as an action with a successful DC 15 Strength (Athletics) check. Secret doors are made of stone and blend in with the surrounding stonework. Finding a secret door requires a search of the wall and a successful DC 10 Wisdom (Perception) check.
Light. All caves are illuminated by hanging oil lanterns attached to rope-and-pulley mechanisms that make it easy for the gnomes to lower the lanterns and refill them with oil.
Waterfall. The caves of Gnomengarde echo with the roar of the nearby waterfall. The sound is so loud that gnomes and visitors must shout to be heard unless there's a closed door between them and the waterfall.
Quest Goals
To complete the Gnomengarde Quest, the characters must obtain at least one magic item from the gnomes. Of the items they can secure, only the hat of wizardry interests Townmaster Harbin Wester, who offers to buy it for 50 gp even though he knows no one who can attune to it. However, the gnomes won't hand over any magic items until the characters speak to Fibblestib and Dabbledob in area G11.
Gnome-Made Magic Items
If the characters rescue Gnerkli and end Korboz's madness, the grateful gnomes give them a clockwork amulet and pole of collapsing (from area G13). The characters also receive a gift from each king: a wand of pyrotechnics from Gnerkli and a hat of wizardry from Korboz. Give the players the Clockwork Amulet, Hat of Wizardry, Pole of Collapsing, and Wand of Pyrotechnics cards as their characters obtain and identify each item or they can reference them in the Magic Items Listing.
Arrival
A stream leads the characters to a pool fed by a waterfall that tumbles down the mountainside. Describe Gnomengarde's location to the players as follows:
You follow a stream uphill to the base of the mountain, where waterfall erosion has carved out a natural concavity. The roaring waterfall creates a cloud of mist as it plunges into a shallow pool of water, within which rise two small islands covered with two-foot-tall red, green, and purple mushrooms. Several cave openings overlook the pool from rocky ledges twenty to thirty feet above. The mountain blocks any sunlight from reaching this place.
Gnomengarde has five cave entrances perched atop ledges with sheer, rocky slopes. Climbing to a cave requires a successful DC 13 Strength (Athletics) check. A narrow footpath ascends the northeast slope, making it an easy climb to that cave entrance without a check.
Gnomengarde Roster
Twenty rock gnome recluses dwell in Gnomengarde, including King Gnerkli and King Korboz. The gnomes' names and locations are described in the "Gnomengarde Locations" section.
Mystery Monster
There used to be twenty-two gnomes living in the caves, but a mimic devoured two gnomes - named Orryn and Warryn - in the past tenday. The creature is currently disguised as a barrel in area G8, but it will devour more gnomes once its hunger returns unless it is dealt with. It can move around and adopt other disguises as needed, though its forms are limited to Medium objects such as chairs, large chests, lecterns, and weird gnomish inventions of the mimic's size and mass. The mimic can also disguise itself as a door, a false section of wall, or a rocky bulge on the floor.
After speaking to Korboz and learning about the presence of a shapechanging monster, the characters' primary goal should be to find and slay the creature. When it attacked Korboz, it looked like a 10-foot-square rug in the throne room (area G14), but it has since moved elsewhere and changed its appearance.
If pressed, the rock gnomes help the characters find the mimic by poking objects with nonmagical wands to see if they fight back. The gnomes aren't adventurers, however, and they flee at the first sign of danger (real or imagined).
The mimic completely devours and dissolves its victims, leaving no trace behind and relocating after each kill. It won't leave Gnomengarde of its own accord, as it's taken a liking to the taste of gnome flesh.
If you want a more interesting antagonist, make the mimic one of the rare varieties that can carry on simple conversations in Common. Characters who corner the talking mimic can negotiate with it, and can compel it to leave Gnomengarde with a successful DC 15 Charisma (Intimidation or Persuasion) check.
Wild Magic
Wild magic is a kind of magic that can't be controlled, and Gnomengarde has long been a source of it. When a creature anywhere on the Gnomengarde map expends a spell slot to cast a spell of 1st level or higher, an additional effect might occur. Roll a d20 and consult the following table to determine the effect, if any. This wild magic effect lasts for 1 hour, or until ended with a remove curse spell or similar magic.
| d20 | Wild Magic Effect |
|---|
| 1-6 | None |
| 7-10 | The caster's skin turns a vibrant shade of blue. |
| 11-14 | Tiny, insubstantial motes of light circle the caster, shedding bright light in a 10-foot radius and dim light for an additional 10 feet. |
| 15-17 | The caster sprouts wings like those of a butterfly. The wings give the caster a flying speed of 30 feet. |
| 18-19 | The caster teleports up to 60 feet to a random unoccupied space of the DM's choice. |
| 20 | A whimsical effect of the DM's invention. |
Gnomengarde Locations
The following locations are keyed to the map of Gnomengarde.
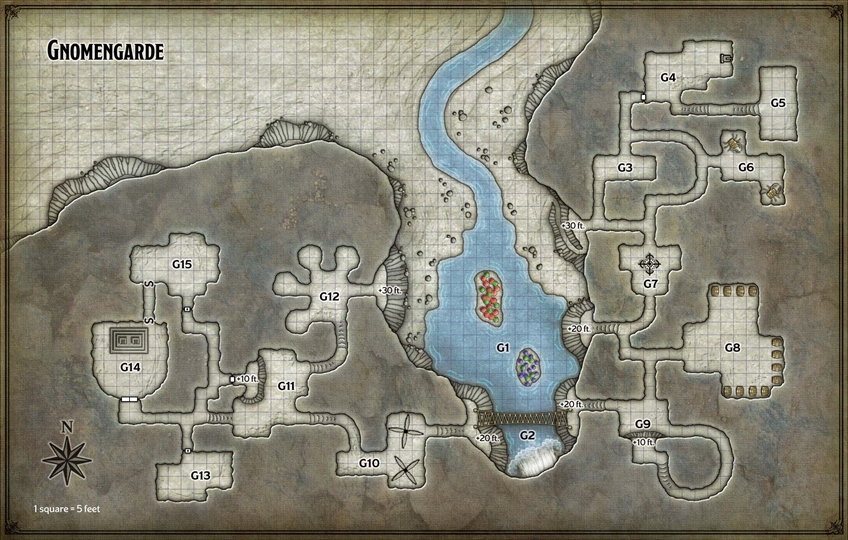
G1. Misty Pool and Mushroom Islands
The gnomes subsist on 2-foot-tall mushrooms that grow atop two small islands in the middle of this 3-foot-deep pool. The islands are perpetually shrouded in mist from the waterfall. Magic bestowed upon the islands by Gnomengarde's first settlers causes the mushrooms to grow to abnormally large size. This same magic is the source of Gnomengarde's wild magic (see above).
The mushrooms come in three colors. Red mushrooms provide oil that the gnomes use to fuel their lanterns and other mechanical devices. Green mushrooms are ground into flour and used to make a tasty green bread. Purple mushrooms are crushed and fermented to make mushroom wine, which tastes as good as it sounds.
G2. Waterfall and Rope Bridge
The waterfall plunges 60 feet, its mist lightly obscuring a 35-foot-long rope bridge firmly anchored to 20-foot-high ledges. The bridge is difficult terrain (see the rulebook), and sags so that its midpoint is only 15 feet above the water. A creature that falls or jumps from the bridge takes no damage if it lands in the water, which is 5 feet deep in the area below the bridge. The bridge has AC 11, 30 hit points, and immunity to poison and psychic damage. The barrel crab contraptions in area G6 are too clumsy to cross the bridge without getting tangled in its ropes.
G3. Dining Room
This room contains several dining tables and chairs sized for Small folk. A stout wooden cabinet against the east wall holds tin dishware and utensils.
G4. Kitchen
This kitchen is furnished with gnomes in mind, so everything is either close to the floor or readily reachable by tugging on an overly complicated rope-and-pulley mechanism. Five rock gnome recluses busy themselves here:
- Joybell (female) uses a poker to stoke the fire of a hot iron stove standing against the east wall.
- Dimble (male) uses a complicated press-like contraption to squeeze oil out of a big red mushroom and filter the liquid into four oil flasks.
- Panana (female) stands atop a low table and uses a mechanical rolling pin contraption to kneed green bread dough. The severed caps of several big green mushrooms are set around her.
- Uppendown (male) forms the dough into loaves of green bread, his tongue sticking out as he carefully shapes each loaf like a master sculptor.
- Tervaround (female) teeters on a stool as she stuffs a big purple mushroom into a barrel, so that it can ferment and be turned into mushroom wine.
Characters who question the gnomes are urged to speak to Fibblestib or Dabbledob in the workshop (area G11), as they know more about what's going on than any other gnomes in the complex. These gnomes won't leave the kitchen, but they can point characters in the right direction. The gnomes avoid talking about the missing gnomes or Mad King Korboz.
G5. Pantry
This room is piled high with small wooden crates. Each contains loaves of green mushroom bread and other foodstuffs collected and kept by the gnomes.
G6. Barrel Crabs
Parked in alcoves in this otherwise empty room are two gnomish contraptions. Each resembles a crab with a barrel for a shell, six articulated metal legs, and a pair of forward-facing pincer claws. A hatch on the top of each barrel opens to reveal an interior compartment equipped with a small, leather-padded seat surrounded by levers, pedals, and gears. The barrels are not airtight.
The gnomes built these crablike contraptions to grip and move other objects, rather like crude forklifts. However, the contraptions are so clumsy that they are useless for delicate work. They are just small enough to navigate Gnomengarde's 5-foot-wide passageways.
Each barrel crab is a Large object with AC 15, 30 hit points, a Strength score of 10, and immunity to poison and psychic damage. It is designed to hold a single Small humanoid, though a Medium humanoid can fit inside with some discomfort. While in the barrel with the hatch closed, a creature has total cover against attacks from outside the contraption. It can use its action to make the contraption scuttle across the ground at a walking speed of 15 feet or make one attack with its pincer claws.
Claws. Melee Weapon Attack: +2 to hit, reach 5 ft., one target. Hit: 5 (2d4) piercing damage, and the target is grappled (escape DC 10).
G7. Autoloading Crossbow Platform
Bolted to the floor of this room is a rotating platform equipped with four heavy crossbows that reload automatically. Each crossbow comes with twenty bolts. Mounted above the crossbows at a height of 6 feet is a chair equipped with pedals that causes the entire contraption to spin counterclockwise, and with levers that reload and fire the crossbows. This clanking, clattering contraption is a Large object with AC 13, 45 hit points, and immunity to poison and psychic damage. Every time it loses 10 hit points, one of its crossbows breaks.
A creature sitting in the chair can use an action to rotate the device up to 360 degrees counterclockwise and fire up to two of its crossbows in any direction. Each crossbow makes the following attack.
Heavy Crossbow. Ranged Weapon Attack: +5 to hit, range 50/200 ft., one target. Hit: 5 (1d10) piercing damage.
Sitting in the chair when the characters first enter this area is the device's inventor, a rock gnome recluse named Facktoré. When she sees strangers, Facktoré decides to test out the contraption on them. She stands down only when she or her contraption cease to function, or when she can no longer see any targets. Being deranged and utterly consumed by her work, she can barely string together a cohesive sentence, let alone advise visitors on where to go or whom to talk to.
G8. Mimic and Mushroom Wine
This room contains twelve forty-gallon barrels set into wide alcoves. Each barrel is secured by a wooden brace. The barrels in the south alcove have been tapped with wooden spigots. Two of those barrels are half full, and two are nearly empty.
Seven of the eight barrels in the north and east alcoves are untapped and full of mushroom wine. The eighth barrel is the mimic. You can decide where the mimic is, or roll a d8 to randomly determine which barrel is the fake one. See "Mystery Monster" for more information on the mimic and its behavior when discovered.
G9. Gnome Guard Post
Mist from the waterfall dampens this empty cave, which has a 10-foot-high ledge overlooking it to the south. The ledge can be reached by following the curved tunnel to the east, or by scaling the slick rock wall with a successful DC 12 Strength (Athletics) check.
Two rock gnome recluses stand on the ledge - a female named Ulla and a male named Pog. When anyone enters the cave, Ulla calls out, "Who goes there?" in Gnomish, then Pog repeats the question in Common. Their orders are to "attack shapechangers on sight." Since anyone might be a shapechanger, they attack anyone who can't prove they are who they claim to be. Characters who don't want to be attacked must succeed on one of the following checks:
- A DC 10 Charisma (Deception) check to trick the gnomes into thinking the characters have an audience with the kings of Gnomengarde.
- A DC 10 Charisma (Intimidation) check to scare the gnomes into thinking that any harm visited upon the characters will result in Gnomengarde's destruction.
- A DC 10 Charisma (Persuasion) check to convince the gnomes that the characters can't be shapechangers, as shapechangers would surely take less conspicuous forms.
G10. Spinning Blades
This area is lightly obscured by mist from the waterfall. The larger eastern part of the room contains two rapidly spinning devices that look like turnstiles fitted with stacks of long, sharp blades spaced 1 foot apart. The northern turnstile spins counterclockwise, while the southern one spins clockwise. Any creature that enters or starts its turn in the eastern part of the room while the blades are spinning must make a DC 15 Dexterity saving throw, taking 18 (4d8) slashing damage on a failed save, or half as much damage on a successful one.
Set into the south wall of the smaller western part of the room is a brass lever in the down position. Pulling the lever up causes the turnstiles to stop spinning, allowing safe passage through the chamber. The rock gnomes bypass this trap by using the mage hand cantrip to move the lever from the east doorway.
G11. Inventors' Workshop
As the characters approach this area, they overhear an argument in Gnomish between two rock gnome recluses - a male named Fibblestib and a female named Dabbledob. As Gnomengarde's foremost inventors, they are trying to dream up an invention that will cure King Korboz's madness. Fibblestib's proposal is a "sanity ray." Dabbledob thinks that's dumb, and wants to build something called a "straitjacket" instead. If the characters interrupt them, the gnomes realize that the new arrivals might have another solution, so they fill in what's been happening and ask for any advice on how they might help cure Korboz and rescue King Gnerkli.
Fibblestib and Dabbledob consider the mystery of the vanishing gnomes of secondary importance to their mission of aiding their kings. They focus on Korboz and Gnerkli to the exclusion of all else, promising magical rewards in exchange for aid (see "Gnome-Made Magic Items").
The workshop is cluttered with half-completed gnomish inventions that serve no purpose, as well as worktables strewn with tinker's tools. A 10-foot-high ledge overlooks the room, set with a wooden pedestal on which sits a leather-bound book.
Treasure. The book on the pedestal is a spellbook that the rock gnomes of Gnomengarde share. Its cover describes its title as Magick of Gnomengarde (in Common and Gnomish), and it contains the wizard spells burning hands, detect magic, identify, mage armor, magic missile, shield, and sleep.
G12. Gnome Domiciles
The floor of this cave is strewn with the remnants of old campfires. Four side caves serve as sleeping areas, with five small wooden cots crammed into each one. Eight rock gnome recluses sleep soundly here when the characters first arrive, with two gnomes in each side cave - Caramip, Jabby, Nyx, and Quippy (females), and Anverth, Delebean, Pallabar, and Zook (males). Characters can move through the area without waking the sleeping gnomes, who defend themselves if attacked but pose no danger otherwise. They avoid talking about the recent troubles, but advise visitors to speak with Fibblestib and Dabbledob (see area G11), Gnomengarde's two most gifted rock gnome inventors.
G13. Treasury
The door to this room is locked, and Fibblestib and Dabbledob (see area G11) carry the keys. The room contains a jumble of nonfunctional gnomish gizmos, as well as loose gears, twisted bits of metal, and other scraps that the gnomes use to cobble together new inventions.
Treasure. Amid the clutter, the characters can find a clockwork amulet and a pole of collapsing, most easily by scanning the room with a detect magic spell. It otherwise takes 1 hour to find each item. Give the players the Clockwork Amulet and Pole of Collapsing cards if their characters acquire and identify these magic items or they can reference them in the Magic Items Listing.
G14. Throne Room
Situated atop a stone dais are two squat thrones made of scrap metal and sized for gnomes. A secret door in the north wall conceals a short tunnel leading to area G15. Only the gnome kings know of this secret passage.
G15. Gnome Kings' Bedroom
King Korboz has locked himself and King Gnerkli in their bedroom, forgetting that there's a secret door that others could find and use to gain entry. Only Korboz and Gnerkli have keys to the locked main door. If the characters knock on the door or otherwise announce their arrival, Korboz speaks to them from inside the room and warns of a "shapechanger" in their midst. Korboz doesn't regain his senses until the characters assure him that the monster has been found and killed. Whether the mimic is truly killed or not, convincing Korboz that it's dead requires a successful DC 12 Charisma (Persuasion) check.
Korboz and Gnerkli are rock gnome recluses, each wearing a jagged metal crown and a patchwork cloak. Gnerkli is glued to a chair and restrained. Korboz carries a flask of solvent that dissolves the glue on contact. Their room contains all the trappings of a nicely appointed gnome bedroom.
Treasure. A small unlocked chest under the gnomes' bed contains a hat of wizardry and a fully charged wand of pyrotechnics. Give the players the Hat of Wizardry and Wand of Pyrotechnics cards if their characters acquire and identify these magic items or they can reference them in the Magic Items Listing.
UMBRAGE HILL
"Umbrage Hill" is balanced for characters of 3rd level or lower. Higher-level characters won't face great peril here, but they might need to visit this location to buy potions of healing from Adabra Gwynn.
Location Overview
Umbrage Hill got its name after two feuding dwarf clans fought a pitched battle atop it. The cause of their umbrage is a tale lost to time, and only the cairns of the dead now remain. The stone windmill on the hill is a later addition, but is still more than a hundred years old.
Adabra Gwynn, a midwife and apothecary devoted to Chauntea (goddess of agriculture), resides here. A manticore driven out of the mountains by Cryovain the white dragon attacks the windmill shortly before the adventurers arrive. Read the following boxed text to set the scene:
Built on the slope of Umbrage Hill is an old stone windmill surrounded by an iron fence. A large winged monster with a spiky tail is trying to knock down the windmill's front door. A woman appears in a second-floor window, waves at you, and yells, "A little help?!"
Adabra uses the commoner stat block. Characters can fight or negotiate with the manticore, which ceases its attack and flies away if given at least 25 gp in treasure or a few pounds of meat.
If it's not killed, the manticore could return with its mate to make more trouble in the future.
Umbrage Hill Locations
The following locations are keyed to the map of Umbrage Hill.
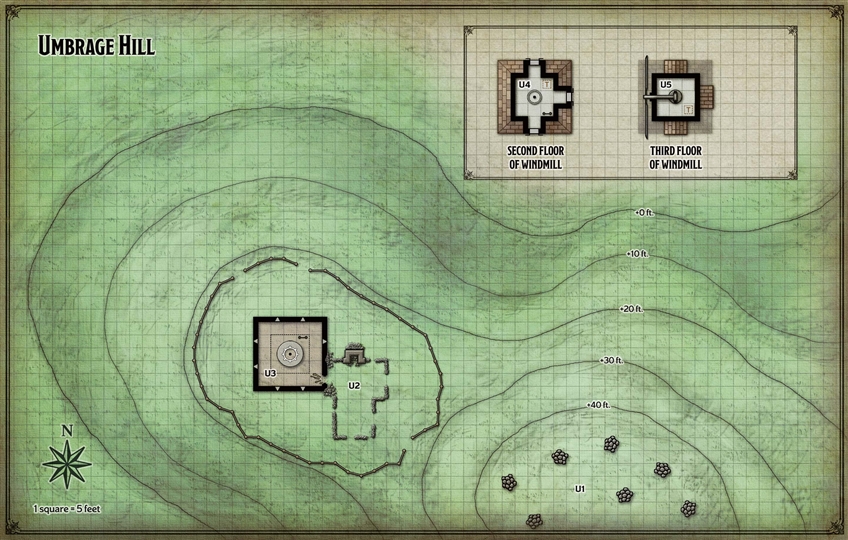
U1. Dwarven Cairns
Dwarves were buried under these rock piles, but their bones, armor, and weapons disintegrated long ago.
U2. Ruins of a House
A fireplace is all that remains of this old stone house.
U3–U5. Stone Windmill
Adabra uses the millstone on the ground floor (area U3) to grind herbs and other ingredients for poultices and potions. Her quarters are on the second floor (area U4). The third floor (area U5) is a loft where guests can stay.
Treasure. Adabra sells potions of healing for 50 gp. Give a Potion of Healing card to any player whose character acquires one of these potions or they can reference it in the Magic Items Listing. If you run out of cards, Adabra has no potions left to sell..
SHRINE OF SAVRAS
"Shrine of Savras" is balanced for characters of 1st to 6th level. This location is not connected to any quest, though one of the entries in the
Phandalin Tales table might lure adventurers here. Characters might also visit the shrine after hearing of it from the wererats in the Mountain's Toe Gold Mine.
Location Overview
Five miles south of
Conyberry is a shrine dedicated to Savras, god of divination and fate. Many years ago, the shrine's priest-seers foresaw a barbarian attack on
Conyberry, giving the townsfolk time to escape. Not all the townsfolk chose to flee, but those who did went to the shrine and brought much of the town's gold with them.
The barbarians eventually tracked the townsfolk to the shrine, besieged it, and slaughtered everyone inside. In the days leading up to this final battle, the priest-seers helped the townsfolk hide their gold in plain sight. They melted down the coins and recast them into a bell, which they painted and hung in the shrine's belfry (replacing the old iron bell). The gold bell hangs there to this day.
Over the years, many other creatures have occupied the shrine. Most recently, a gang of wererats laired here until they were driven out by orcs displaced by Cryovain the white dragon. Recently, ogres wandered by the shrine, saw the orcs, and decided to join them.
Arrival
An old dirt trail stretches from the outskirts of
Conyberry to the shrine, which characters first see from a distance. Read the following boxed text aloud:
A ruin stands in the middle of a vast field north of the rocky foothills of the Sword Mountains. An old stone temple with a belfry jutting from its peaked roof is enclosed by stone walls, many sections of which have collapsed. The trail ends at a crumbling gatehouse, the doors to which were sundered long ago. Three of the four towers that once stood at the corners of the outer walls have collapsed. Only the northeast tower remains, and a guard stands atop it.
The guard spotted atop the northeast tower (area S6) is an orc. During the day, the characters can't approach the shrine without being seen by this sentry, as there are no places to hide in the level field surrounding the shrine. If the characters wait until nightfall, clouds obscure the moon and enable them to approach unseen, as long as they stay outside the 60-foot range of the orc's darkvision. If the orc spots the characters, it cries out, rousing the shrine's other occupants. Once roused, all those occupants attack.
The Enemy Roster table adjusts the number of orcs and ogres in the shrine based on the level of the characters and the number of characters in the party, not counting sidekicks.
Enemy Roster
| Character Level | Number of Orcs and Ogres |
|---|
| 1st | 2 orcs per character plus 1 ogre in the courtyard (area S2), 1 orc atop the northeast tower (area S6) |
| 2nd-3rd | 3 orcs per character plus 2 ogres in the courtyard (area S2), 1 orc atop the northeast tower (area S6) |
| 4th-5th | 4 orcs per character plus 3 ogres in the courtyard (area S2), 1 orc atop the northeast tower (area S6) |
| 6th | 4 orcs per character plus 4 ogres in the courtyard (area S2), 1 orc atop the northeast tower (area S6) |
When rolling initiative for these foes, roll once for all the orcs and once for all the ogres.
Shrine Locations
The following locations are keyed to the map of the Shrine of Savras. Squares filled with rubble are difficult terrain (see the rulebook).
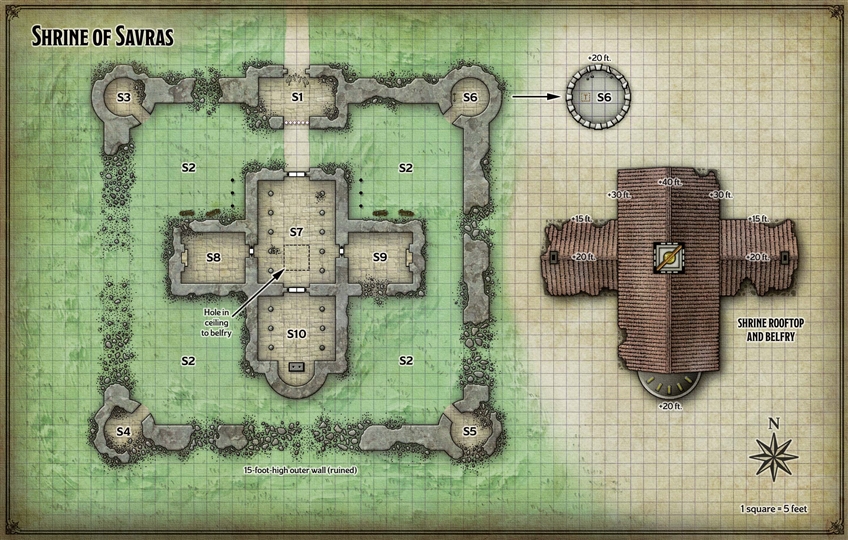
S1. Gatehouse
The gatehouse is 20 feet high, and its outer doors have been smashed to flinders. A rusty iron portcullis blocks the south exit, but is bypassed by a rubble-filled hole in the southwest corner of the gatehouse. The winch to raise the portcullis has been destroyed, but the portcullis can be lifted manually with a successful DC 25 Strength (Athletics) check if desired.
S2. Courtyard
The orcs and ogres camp in this grassy courtyard, which is littered with bones, broken weapons, and shattered armor from past battles. The courtyard has four quadrants. The ogres claim the southeast quadrant, while the orcs claim the remaining quadrants. See the Enemy Roster table for the number of orcs and ogres present.
The courtyard's northwest and northeast quadrants contain rotted wooden troughs and posts that were once used to feed, water, and tether horses.
S3. Northwest Tower
This tower is open to the sky and strewn with rubble.
S4. Southwest Tower
This roofless tower has a rubble-filled break in its southeast wall.
S5. Southeast Tower
Little remains of this tower. Lying amid the debris is a rusty iron bell that weighs 500 pounds.
S6. Northeast Tower
This tower is the only one of the shrine's four towers that has not fallen. An iron ladder inside the tower climbs to a stone trapdoor in the ceiling, through which characters can reach the tower's battlemented rooftop. An orc watches the surrounding countryside from atop the tower.
S7. Main Hall and Belfry
Rows of crumbling pillars support the 40-foot-high vaulted ceiling of this hall. Humanoid bones litter the dusty floor, and a 10-foot-square hole in the ceiling leads to the belfry. No rope hangs from the bell, which appears to be made of untarnished copper. The belfry can be reached from outside by climbing the outer walls and rooftop, which requires a successful DC 15 Strength (Athletics) check. Characters can reach the belfry from inside using magic such as a spider climb or fly spell.
Treasure. Close examination of the bell reveals that it's thin sides are solid gold covered with peeling copper paint. The bell, which is 3 feet wide and weighs 50 pounds, hangs from an iron fixture bolted to a wooden crossbeam. A character with carpenter's tools or smith's tools can use them to detach the bell from the beam in 1 minute. Any creature under the bell when it falls must succeed on a DC 12 Dexterity check to get out of the way, or take 14 (4d6) bludgeoning damage. The gold bell is worth 2,500 gp.
S8. Visitors' Sanctuary
Guests of the shrine were housed here. Later, the wererats used this area as a lair. The room contains six beds with moldy mattresses, the shattered remains of a wooden table and six chairs, and a soot-stained fireplace containing a rusty cauldron hanging from a spit. A narrow break in the north wall provides an alternative exit.
S9. Priest-Seers' Sanctuary
The priest-seers of Savras slept and cooked their meals here. All the furnishings in this area have been destroyed, and part of the south wall has collapsed
S10. Altar of Fate
Six stone pillars brace the vaulted ceiling of this temple, the floor of which is buried under a thick layer of dust. Also covered in dust are four humanoid skeletons in tattered priestly vestments, lying near a stone altar situated in an alcove under four narrow windows. Carved into the front of the altar is a humanoid eye.
A detect magic spell reveals an aura of divination magic around the altar. If Cryovain has been slain, nothing happens when a character touches the altar. Otherwise, any character touching the altar experiences a vision lasting 1 minute, during which time the character is incapacitated. In the vision, the character floats through the roof of the shrine, soars toward Icespire Hold, and sees the white dragon asleep on the fortress's rooftop. (The divination power of the altar is effectively telling the characters where they must go to defeat the dragon.) A character receives this vision only once. Nothing happens to a character who touches the altar a second time.
Treasure. Any character who searches the altar and succeeds on a DC 10 Wisdom (Perception) check realizes that the altar's base doesn't quite touch the floor. The altar has stone rollers built into it and can be pushed 3 feet to the south, revealing an unlocked wooden coffer tucked inside a 1-foot-square cavity in the floor. This coffer contains 57 gp and a mystery key. If the characters acquire and identify the mystery key, give the players the Mystery Key card or they can reference it in the Magic Items Listing.